


The spooky season is officially here! If your kids are like mine, they've been planning out their Halloween costumes since the moment they saw the Halloween decorations at the stores. My kids they love this time of the year with the cooler temperatures, festive decorations, and, of course, the dressing up that comes with the month of October--I mean who could blame them? It's fun to embrace the season and get creative with our kids, and there are endless ideas for crafts and activities for Halloween time. Let me share some of my favorite enchanting, slimy, and ghostly Halloween-themed crafts you can do with your kids!

1. Spider Handprint
Supplies:- Black Construction Paper
- Googly Eyes
- Black String (or any color)
- Glue Stick
- Fold your black construction paper twice "hamburger style" width wise.
- Starting on the fold trace only 4 fingers (skip the thumb) and leave 1/2 an inch from where the lowest cutting point will be.
- Now cut out the handprints, leaving you with two spiders.
- Open your spiders up and add your googly eyes.
- Tape string on the back or glue your spiders onto construction paper and place around your house to spook things up!

2. Leaf Pumpkin
Supplies:
- White construction paper
- Assortment of fall colored leaves
- Hot glue
- To make your leaf pumpkins, you can either cut out a pumpkin shape with your white paper or trace one from an online print.
- Go outside with the kids and collect a variety of fall leaves.
- Use hot glue to paste the their leaves within their cut out pumpkin silhouette.
- Use a piece of brown bark or brown construction paper to make the pumpkin stem, and a green leaf or green piece of paper to make a cute pumpkin leaf.
- Wait until glue has dried and enjoy your nature piece! This is fun because everyone gets to go outside and enjoy nature!

3. Ghost Pom Pom Poppers
Supplies:
- Paper cup
- Balloon
- Tape
- Pom poms
- Scissors
- Sharpie marker
- Small piece of white card stock
- Cut an "X" on the bottom of your paper cup to create flaps.
- Use the flaps you created pull out the base completely.
- Stretch out your balloon a little and tie a knot at the end (still remaining deflated) and cut the tip off with your scissors. Only keep the end with the knot in it.
- Stretch the balloon over the base of the cup and secure it in place using your double sided tape.
- Cut out two arms from your cardstock for your ghost.
- Once cut, fold the edge and attach using your double-sided tape onto the sides of the cup.
- With your sharpie marker, draw spooky ghost eyes and mouth on the cup.
- Lastly add your pom poms to the cup. Pull down on the balloon and release to watch the pom poms pop!

4. Paper Roll Monster
Supplies:- Toilet paper roll
- Colorful construction paper, gauze, or streamer
- Washable paint
- Googly eyes
- Pipe cleaner
This is truly an easy one because the options are unlimited of what they can do!
- Paint the toilet paper roll.
- Cut out some fun hair pieces, mouth faces, ears, or really any fun pieces you want to create their Halloween characters.
- Make a mummy by wrapping the tube in gauze or streamers.
- Add googly eyes to create fun personalities or have them add some pipe cleaner to create arms, wings, or legs to their creation!

5. Halloween Slime
Supplies:- 6 oz. Elmer's glue (You can use glitter glue or add food dye to the white glue)
- 1/2 teaspoon of baking soda
- 1 1/2 tablespoon of contact lens solution
- 2 tablespoons of water (add before adding baking soda for stretcher slime)
- Pour 6 oz. of Elmer's glue into a bowl. Then add food dye for color of choice for your slime. Green, purple, or even orange glitter glue is perfect for this time of year!
- Add in the water and then your baking soda and mix.
- Add your contact lens solution (parents do this). Make sure the solution has boric acid. Without it, your slime won't hold; add half and see consistency, if not forming well, add more if it's too sticky.
- Keep mixing until it hardens (it will also need quite a bit of kneading before being fully formed.)
- Have fun with your gooey creation!

6. Salt and Glue Spider Web
Supplies:
- Construction paper (preferably black)
- Elmer's glue
- Pencil
- Table salt
- Watercolor Paint
- Soft brush
- Start by drawing a dot with a pencil for the center of the spiderweb.
- Draw your spiderweb fanning out from the center.
- Trace over the lines of the web with Elmer's glue.
- Sprinkle salt on top of your glue lines. You will need to let the glue dry before moving onto the next step.
- Once dry, lightly dip your brush in the paint. Then, with plenty of water, dab the salted lines with paint and watch the colors blend.
All done! This truly is a hit with the kids!

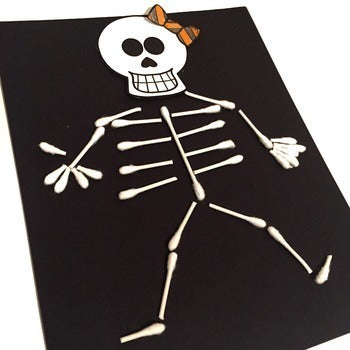
7. Q-Tip Skeleton
Supplies:- Q-Tips
- Black construction paper
- White paper
- Black marker
- Elmer's liquid glue
- Cut Q-Tips into multiple sizes--6 in half for ribs, top of Q-Tip for fingers and feet and in half again for arms and legs (or you can then leave the full length for a bigger skeleton).
- Now make the skeleton head: draw a skull on your white paper and cut it out. You can look up ideas from the internet for cute skull face ideas.
- Once the head is done, start creating the skeleton bone body. Glue each Q-Tip as you place the bones.
- Allow time to dry and their set to show off their funny bone creation!
8. Pumpkin Hand-Print Keepsake
Supplies:- Liquid food coloring (Orange)
- Rolling pin
- Sealer (varnish or PVA)
- 2 cups of plain flour
- 1 cup of salt
- 3/4 cup of boiling water
- Start by making your salt dough by combining flour and salt, then gradually add in your hot water.
- Once dough is formed, add in your liquid food coloring.
- Roll dough into a circle and, if you want, color some dough pieces to create the stem and leaf of the pumpkin.
- Once a circle is formed, have your kids place their hands onto the dough, making sure the fingers are spaced out.
- Push their hand and individual fingers deep into the dough to make sure it leaves a good print.
- Once this is all done, let keepsake air dry overnight.
- After letting it dry, place the handprint into the oven at 120 degrees for 3 hours.
- If dough hasn't fully hardened after this then let air dry for another day.
- Seal with varnish to finish it off. This is a fun keepsake your kiddo will be so proud of!

9. Paper Plate Witch
Supplies:- Acrylic paint (green or purple for witch's skin)
- Black Sharpie
- Glue
- Scissors
- Crepe paper roll (for witch's hair: black, orange, green, purple, and yellow for witches hat belt)
- Black construction paper
- Googly eyes (the bigger the better)
- Start by painting your paper plate (make sure not to use too much paint and make the plate soggy).
- Let dry and move on to making your witch's hat by cutting a triangular hat shape out of black construction paper.
- Cut the witch some hair of your desired color of crepe paper.
- Turn over the witch's hat and glue hair pieces onto the bottom.
- Flip over the hat, with hair attached, and glue a crepe paper belt around the witch's hat.
- Glue the hat onto the top of the paper plate.
- Time to start on the witch's face. Add those googly eyes and draw the witch's nose, mouth, and maybe a mole or two!
Simple as that, it's done and your kiddo can show off their wicked masterpiece!

10. Monster Tic-Tac-Toe
Supplies:- Colorful tape or duct tape
- Rocks (small to medium sized)
- Googly eyes
- Acrylic paint or markers
- Small cardboard piece or 1 piece of construction paper
- Black Sharpie marker
- Paint rocks
- Let dry, then glue on some silly googly eyes and draw hair, mouths, or details that add to their spooky character.
- Once dry, make your playing board on paper or on a cardboard piece.
- Create the tic tac toe playing board and there you have it! Let the game begin!

I hope you've enjoyed finding some fun crafts that you make with your kids! They truly have been so much fun for me to make with my kids, and they always leave so proud of what they've created! I love that these fun Halloween crafts don't require you to spend much at all, because most of these items you already have in your household. Whatever you come up with, I'm sure your little ones will love making those happy memories with you!
Let us know what craft you love making with your kids and if you've tried any from our post! Happy Halloween!!